Learn how to make gluten-free no starter fermented buckwheat bread. Furthermore, it is Candida diet friendly and sugar-free.
I’d been thinking of making a tutorial video of my fermented gluten-free buckwheat bread for some time. However, only now did I finally manage to film, edit and upload it for you to enjoy.
This buckwheat bread is undoubtedly my favourite bread of all times. That is both in terms of the taste/texture as well as the recipe. The reason is that my fermented gluten-free buckwheat bread is vegan, oil-free, sugar-free, yeast-free, dairy-free, Candida diet friendly and a no-knead recipe. The making takes a bit of time, but it’s mostly inactive. you can mind your own business while the buckwheat groats are soaking, the batter is fermenting or the bread is baking and cooling. The best part is that the recipe is actually easy to make. It’s quite impossible to fail if you follow the recipe and don’t use metal bowl for fermenting and/or metal spoon for mixing already fermented batter. I especially like the no-knead part of this recipe as I have never enjoyed kneading a dough ball for 10 minutes at a stretch.
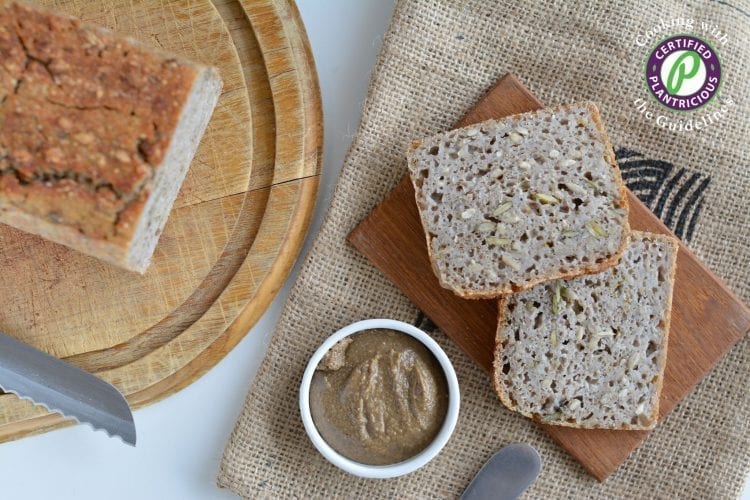
Furthermore, the recipe is totally worth the effort! Imagine taking the fresh bread out of the oven and cutting into it after it has cooled down. It’s heaven! Spread a little bit of tahini or any other nut or seed butter onto your fermented gluten-free buckwheat bread slice. For crunchiness, add some fresh cucumber and/or tomatoes, sprinkle with black pepper and you are ready to enter the gastronomic heaven.
Should you be interested in reading a bit about buckwheat and getting the recipe in writing, go to my Fermented Buckwheat Bread recipe blog post. I wrote it some years ago when I first started to make this delicious bread. After all, it’s easier to follow the quantities from a written recipe rather then watching a video when you actually start making the bread.


Hello, I am very excited to try this recipe, I have seen above people mentioning that their oven doesn’t go that low and it is the same with mine, I live in quite a chilly cottage with only a Log burner and so I’m wondering what you think about popping it on top of the log burner overnight when it is all closed up and burning gently??? I was thinking just to try it but maybe its a silly idea to have head bellow in this case…… maybe next to. Also Im soaking in apple cider vinegar is this okay as long as I rinse well after? Thank you.
Hi Holly!
I wouldn’t put it onto the long burner as the temperature can maybe get too high in the bottom of the bowl. If it’s quite chilly, then the batter will ferment in about 36-48 hours. Cover the bowl with plastic and maybe wrap it into thick towels and check in every 12 hours or so.
Apple cider vinegar is totally fine — I also soak my groats in water with some ACV added and rinse it before blending.
Happy baking!
I really like your video as it is. I prefer scale because it’s more accurate as well. I’ve been reviewing many recipes like this, but by far this is one of few easy to follow and with clear steps and video. Just follow your recipe, I was able to make the bread like yours (no as beautiful as yours) but it’s successful. I am so happy to find your blog. One question, can I use the same recipe to mix in with different grains, like wheat berries and/or quinoa? What’s your suggestions? Thank you!!
I’m so glad that you like my recipe and blog!
I very often make the bread with buckwheat and quinoa — I substitute 100g of buckwheat with quinoa and all the rest is the same, except I add 10-20g less water when blending the batter. I’ve also found that it ferments quicker with quinoa.
All the best!
Thank you for this recipe (and your entire blog). You are a life saver!
Thank you so much Emily! All the motivation I need! 🙂
I made this bread and when I sliced it open and was eating it, it smelled like beer. I didn’t get sick or anything. The next morning the smell dissipated. I wondered if it was because I added raisins and cinnamin and let it ferment for the few more hours more before putting it in the oven. Wondered if the sugar from the raisins was feeding some sort of yeast. And if I had put it straight into the oven after adding the raisins, would it not have done that? Or was it too fermented overall?
Hi Chloe! Yes, I definitely think it had something to do with the raisins and the sugar in them 🙂 Bake it straight away or max after one hour after you’ve stirred in the raisins. I couldn’t say whether it was too fermented as I don’t know for how long and at what temperature you let it ferment.
Hi, thank you for the recipe.. I let it ferment about 15h in the kitchen but covered with a warm big cloth.. This morning when i opened it it stinked alot i lt was very fermented.. Is that ok ? Is ig not destroyed ? Can i eat it ? I am baking it now but i will wait for your reponse wether it is ok to eat it or not. Thank you
I already answered to your other comment. Just wanted to add that try fermenting for a shorter period of time next time. Check on it when 7 hours are up and then again in every 1-2h.