Description
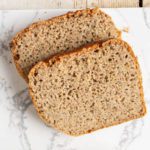
Learn how to make gluten-free sprouted bread with buckwheat and red lentils. This bread is also a no flour and no yeast recipe. Furthermore, you won’t need any starter either.
Soaking time: 4-6 hours
Fermentation time: 5-24 hours (depending on the temperature)
Ingredients
- 285g (10.05oz) raw buckwheat groats
- 140g (4.9oz) whole red lentils (not split)
- 3/4 tsp. Himalayan salt (1/2 + 1/8 tsp. for Plantricious version)
- 1 tbsp. date syrup
- 240g (8.5oz) filtered water + water for soaking
- 2 tbsps. dried oregano
Instructions
Soaking
- In a large bowl, soak raw buckwheat groats and red lentils for at least 4-6 hours. However, overnight is equally fine. Add enough water to cover the groats and lentils bearing in mind that they will expand significantly.
- After soaking, take a large sieve and thoroughly rinse the groats under running water. You’ll notice that the water is quite slimy. Not to worry though as it’s normal.
- Now, place the sieve in the mount of a large bowl to let it drain completely. It may take a few minutes.
Sprouting (optional)
- Simply leave the soaked buckwheat and lentils in the sieve in the mouth of a large bowl and cover with clean kitchen cloth. 24 hours should suffice for the buckwheat to have visible sprouts and lentils to have tiny ones.
- Rinse the groats and lentils with cold water several times during those 24 hours. Otherwise, you might have mould developing. To be absolutely certain, you may divide the groats between two large sieves. This way you have more air flowing between them. Learn more from How to Sprout Buckwheat.
Blending and Fermentation
- Take your soaked groats and lentils and transfer them into a large glass or ceramic bowl. Metal bowl will interfere with fermentation process.
- Next, add salt, date syrup, and filtered water and process with either a regular blender or an immersion blender. I’d suggest choosing an immersion blender as your tool. It’s because I’ve found it easier to handle. In case you’re using Vitamix, be careful not to over-blend the mixture as you might end up with a bread that’s too dense.
- After blending, cover the bowl with a plastic or a clean kitchen cloth and place it onto your kitchen counter or into warm oven (30-35°C)
- Now, the time needed for fermentation can vary a lot. In warm oven, it’ll take 5-7 hours, after which your batter should have risen quite a lot and you should see bubbles throughout the batter. However, at room temperature it can even take up to 24 hours depending on the actual temperature. Check the video for visuals.
- Be careful not to ferment the batter for too long though. If it smells foul, I’d suggest you throw it out. You’ll learn what is the maximum time for fermentation in your kitchen by trial and error. However, in the beginning I suggest you follow the timeframe given in this recipe and observe the batter from time to time to catch the state you see in my video.
Mixing and Baking
- Now, gently fold in oregano. Try to avoid vigorous movements not to mess with the fluffiness of the batter. The mixing is necessary because the batter is thicker on top and has some liquid in the bottom.
- Next, pour the batter into bread tin lined with parchment paper. I used my handmade ceramic loaf (27x9cm, 10.6×3.5inch) which is not standard. I’d say you can go for 25x9cm (9.8×3.5inch) bread tin.
- Put the bread into cold oven, close the door and turn the heat onto 175°C (350°F). Make sure NOT to use the fast heat function and NOT to have the grill on. Set the timer to 1 hour and 15 minutes and turn on the oven.
- When the time is up, open the oven door and tap onto the crust of the bread with your finger. The bread is ready if it sounds hollow.
- Remove from the oven, lift the bread from the baking tin, and place onto a chopping board for cooling. Let the bread cool completely before slicing into it. This takes about an hour. Should you be extra impatient, 30 minutes is the minimum you ought to be able to wait.
Notes
Instead of date syrup, you can use store-bought date paste or homemade date paste, molasses, maple syrup, or even honey.
If your sprouts have grown enough, but you can’t blend the batter right away, transfer them into a bowl, cover and store in the fridge until you have time.
The same goes for fermented batter – if you see that it doesn’t need any more time to ferment, move the bowl in the fridge. It can stay there overnight and wait for being baked.
Nutritional data is given for Plantricious version. Bear in mind that the carbohydrate content doesn’t take sprouting or fermentation process into account. So, the count is probably lower than shown below.
- Prep Time: 15 minutes
- Cook Time: 1h 15min
- Category: Bread
- Method: Oven
Nutrition
- Serving Size: 1 slice (1/22 of the recipe)
- Calories: 73 kcal
- Sodium: 64.79mg
- Fat: 0.6g
- Saturated Fat: 0.1g
- Carbohydrates: 14.6g
- Fiber: 2.2g
- Protein: 3.4g